Tuesday, June 12, 2012

Week 15 - Presentation and Reflection

I spent the remainder of this week producing the last drawings that I needed for my presentation and creating my panel and power point. The images below are my panel for the presentation and the slides from my presentation.


Overall, I found this series of projects to be quite challenging, going from out first group design project then taking that key idea on individually. I am very happy with how my design turned out, I had been struggling a lot in the last few weeks to come up with a design that I really liked, but I believe I have achieved this now.  


Wednesday, June 6, 2012

Week 14 – The Final Design and Presentation Preparation


My progression from last week in terms of the design has not been huge, as I have only changed the layout of the exterior walls to create a more organic shape. I have still got the same spaces in the same positions, the kid’s obstacle course on the left and the social and interactive areas on the right. I have also taken the time to define some of the smaller elements of my design. Such as the learning space for the older kids, which will be learning through the shapes of the seating and the root arches, will also has free access to wifi and the Brisbane City Council eLibrary. I have also polished the entry point, which opens up to a café area with an information desk for patrons, which can be seen in the Ground Floor Plan below.

Ground Floor Plan
 I have also made some slight variations to my First Floor Plan, by incorporating a staff office and storage space upstairs as well as an open walkway which snakes between the rooms on the first floor. This represents the multilevel interaction that happens within the various ecosystems of the mangrove roots. I have also added an outdoor balcony area off the computer room, to be used as a relaxation area to sit in the sun and take in the River views. This can be seen in the First Floor Plan below.

First Floor Plan
In making my floor plans more organic, I also changed the layout and sizes of the steel arches, to make them look more natural and random. Instead of tightly hugging the building like in my previous designs, the arches span over and under, in and around each other with the building been created by the shapes of the spaces underneath. Instead of the arches following the buildings shape, the building is created by the arches shape. The roof plan, which shows this layout, can be seen below.

Roof Plan
In terms of site placement, I have also greatly improved my site plan since the last project. I have drawn the site map (which can be seen below) in which I will Photoshop the roof plan to the appropriate scale. I have placed the building on the same site as my Folie and Project 2, which is on the water front, just next to the second boat shed. The building will be along the bikeway for easy of entrance and also for safety, so people do not have to stray far from the main thru fare to access the building. With the buildings placement on the river’s edge and the library been designed for children, I ensured that all of the entry and outdoor spaces were fenced to ensure there is no issues with the children encountering the water.

Site Plan
My next step in creating my presentation documentation was to build my model. I thought with the organic form of the building, that it would be faster and more accurate if I was to construct my model and then complete the drawings using it as a reference point. I began my construction by taking a copy of my roof plan and gluing it to the base. I then cut wire to the appropriate lengths and stuck it into the correct positions. This way, I could construct all of the arches to see how the basic form resembles what I wanted before adding the exterior cladding; the photo below shows the steel arches.


 My next stage was to add the exterior cladding to the model. Because I want to use a translucent material which will allow the light and shadows of the arches to filter through, I decided to use trace paper as my material. I simple cut the trace to lengths and wrapped and weaved it around the wire to create the buildings shape. I then built the exterior balcony and the Folie poles which act as fencing around the grass play area and the front gate. The final product can be seen in the photos below.


I am very happy with how my model turned out and I think it will be very useful when continuing with my drawings. Between now and next week, I will be producing the rest of the drawings which include elevations, sections, a hero shot and perspectives. The final panel and powerpoint jpegs will be uploaded next week for my week 15 entry. 


Tuesday, May 29, 2012

Week 13 – Creating a Solid Floor Plan


Since last week, I have continued with the same idea for the form of the building, but have continued to evolve the floor plan and spatial layout. Last week, my design consisted of pod like shapes liked together by the arches. In this plan, I have created a more open, free flowing shape that is reflective of the Brisbane River shape which can be seen in the Ground Floor Plan below.

Ground Floor Plan
In terms of the different spaces for different age groups, I have decided not to prescribe the spaces to certain age groups, but instead create spaces that certain age groups would enjoy and be comfortable in, but not restrict them to these areas. In the floor plan above, the area on the left is a children’s obstacle course created by the different kinds of mangrove roots, which can be seen below. The kids of any age, will be able to crawl and clamber over the roots, having fun whilst also learning about the structure of the mangrove filtration system, its roots.


The area on the right hand side of the library is dedicated for the older children and consists of a variety of seating options to be used for group social and education meetings. There is a booth which runs along the wall in a curvaceous form, similar to the Brisbane River and also the mangrove root column seating from the last project, both of which can be seen below.


As with my other designs, the upper floors have been set aside for quieter and more private areas. The First Floor Plan below shows the two areas that make up the upper floor plan, the computer room and kid’s reading room. The rest of the floor is an open void to allow the ground floor to be a large double height area to allow maximum viewing of the root arches. The reading and computer rooms only have half walls, to allow the users to look out over the void.

First Floor Plan
I had considered the style of desk used in the computer room and thought that a curved surface could separate off individual working space areas. This would also create a ripple shape around the top of the building which would resemble the water lapping at the mangrove roots. This idea can be seen below.


In terms of the arches and how the exterior of the building would look, the following sketches depict the layout of the steel arches and a rough idea of how it will look in perspective.


Tuesday, May 22, 2012

Week 12 - A New Direction in the Design Process


From last week, I decided to take a different approach to how I was looking at the mangrove roots, because my previous tactics had not been creating what I wanted. So instead of trying to create forms that replicated the shape of the roots, I decided to look at the spaces created by 
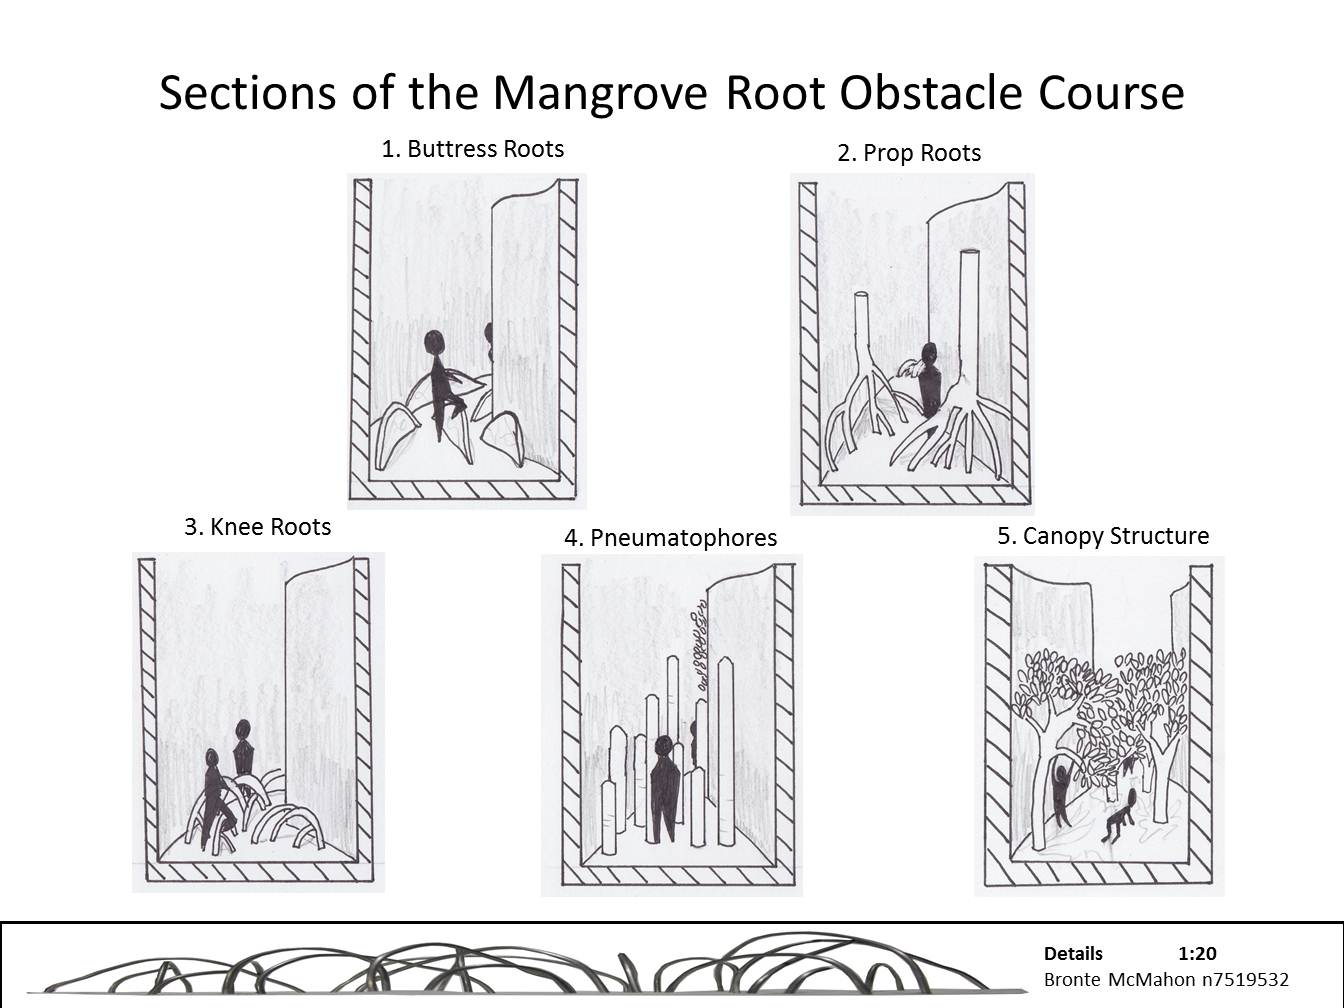
the roots. I began by going over my previous research and looking at the shapes of the roots and the spaces that are created within them. My favourite shapes were the roots the arched over one another to create layers of shapes and spaces. I have done a quick sketch below to show this.


So I decided that my structure would be made from a series of overlapping arches that would create spaces within them. I did some research to find some examples of how the structure could look, both from the interior and exterior. I found this image below of an atrium area in Toronto which has intricate arches and a glass roof, so when the sun is overheads, the shadows created by the arches are projected down into the interior. I really liked this design because if I used a similar approach, then it could look like the sun shining down through the mangrove roots.

Arches, Toronto (Wikipedia, 2008)
In terms of exterior, I really wanted the root structures to be seen from the outside, so that the building resembles a mass of mangrove roots. A structure that reminds me of this is the Birds Nest Stadium, which can be seen below. The metal structure also becomes the feature at night time, as the backlighting accentuates the shapes.

Birds Nest Stadium (Randal, 2011)
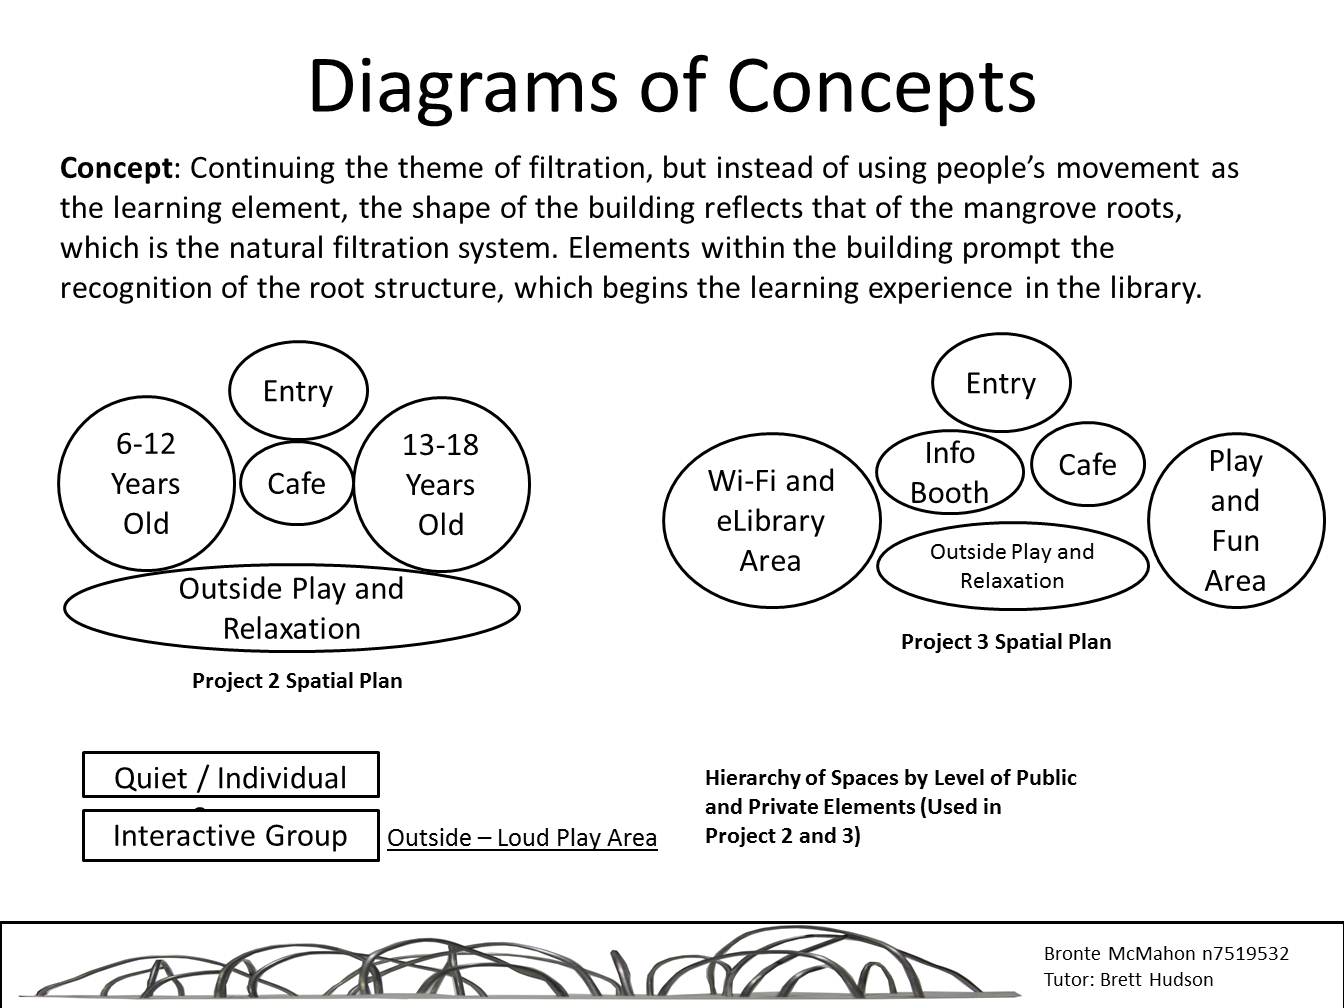
I began the next stage of the design process by taking my initial bubble diagram and drawing on the rough placement of arches, which can be seen below.


The shape would be created by a series of pods with a random placement of arches, similar to the randomness in the mangrove root systems. To take the idea from plan form to the third dimension, I used the roof plan to create an elevation, which can be seen below.


From this view, the mangrove inspiration can easily be recognised, as the root structures twist and overlap one another. My next step was to create some rough floor plans, which can be seen below. I decided to keep the two levels, to have public and private areas. In my previous designs, each age group had specific areas from them, but I have decided that I will design spaces aimed at certain age groups, but they have no obligation to stick to these groups. The insets and notes on each plan details some of my ideas for the spaces, which I have taken from my initial design and also exemplar research.

Ground Floor Plan

First Floor Plan

In terms of how the arched spaces work across the levels, I have decided that there will be a lot of voids, to create a layer of views and filtered lighting as you walk through the spaces. Hopefully this will create a realistic effect of how it feels inside mangrove roots. The section below shows an example of the voids.


Material wise, I wanted to use a semitransparent material that is strung between root structures. This will create a skin across the building that will allow light to filter through and create shadows where the steel root structures are. I have not fully resolved this yet, but will do so when finalising the plans and details. The sketches of these ideas can be seen below.


Resources:

Wikipedia. 2008. “Ärches, Toronto” Accessed May 22nd. http://en.wikipedia.org/wiki/File:Arches_Toronto.jpg


Tuesday, May 15, 2012

Week 11 – Continuation Design Refinement


This week has been a continuation from last week’s post, where I have been working through the concepts and ideas discussed last week and have produced a set of drawings. I had another idea that will largely influence the layout of the building, one which incorporates the views concept from out original folie. I have decided that I could possibly use the prescribed views to define each age group, by having each age group area orientated toward a certain area. The following diagram shows how I plan on achieving this. 


Each age group will have two levels for public and private spaces, both of which are orientated towards the prescribed view (Story Bridge, across the river and the Cliffs). I played with a few options of how the separated sections could look by using different shapes to create the levels, which can be seen below.


Using these theories, I began to produce a floor plan, which can be seen below. The bottom floor layout is reflective of the shape of a tree trunk. The almost circular shape is then complimented by a radial layout of spaces, which is similar to the rings of a trees trunk. I have kept all of the public spaces on this level, with the entry, information area, café and outdoor learning and play areas. The central column of the building houses the elevator and a set of stairs that wind their way around the buildings core. The building itself is situated right on the Brisbane River, where the mangroves would naturally grow. This ground floor plan can be seen below.

Ground Floor Plan
The first floor houses the public areas for each age group. These spaces can be used for group activities, planned events or just general social areas. Whilst I have not prescribed an age group to each view, there is a view of the cliffs, the Story Bridge and the river bank. The first floor plan can be seen below.

First Floor Plan

The second floor houses the private areas for the various age groups. These spaces can be used for quite reading and reflection, computer areas or meeting areas for the older children. Each age group will have two spaces on this level, to coincide with the mangrove root theory of the continuous separation. Again, the age group areas will be orientated to their designated view. The second floor plan can be seen below.

Second Floor Plan
The building itself will have a shape that is reflective of the city structure, very angular and cubish. The shapes will be stacked on top of one another and supported with poles that reflect the shape of the mangrove roots. A rough elevation can be seen below.

Elevation from Brisbane River


Tuesday, May 8, 2012

Week 10 - Redesigning


After the presentation last week, the next step in the design process for this assignment is to extend from our last design. The feedback I received was that the concept of the mangroves was not clear in the architecture, only in the interior design qualities. I decided to further research and analyse the form of the mangrove to find some inspiration for the building shape and layout.
The image shows a small mangrove tree growing in the water. I noticed with a lot of the different species of mangroves, that they are very bottom heavy, in the sense that besides the leaves and trunk, their main feature is the twisting root system.


Mangrove Image (Reef Ball Foundation Inc, 2007)
I thought this could potentially be a starting point for the spatial layout of the building. Using this idea of a singular object which splits and separates into multiple individual objects that have their own functions could be how the library is laid out. This idea would fit easily into my concept of public to private filtration which is achieved through levels. The diagram below shows how I would achieve this layout.


The only problem with this idea is that to achieve this concept in the building, the idea of the mangrove would have to be inverted, so that users enter the building at the singular section (ie the trunk) and as they move further up into the building, they reach the smaller areas (ie the roots).

The other idea I got from researching the mangrove form was how the mangrove roots entangle within themselves to create smaller spaces, which can be seen below. In my original design, I had split the age groups into 6-12 and 13-18 years old. After some consideration, I decided to add another age bracket into this and have a 10-14 yrs old area. Using the theory of the mangrove roots, as well as dividing each age group, I will split the spaces again to create public and provide areas within each age group to ensure each child gets the most of the library. 


I will continue to work on these ideas next week to try and create a rough set of plans to present for feedback for next week.

Sources:
Reef Ball Foundation Inc. 2007. “Mangroves” Accessed May 7th, 2012. http://www.mangrovesolutions.com/whyimportant.php


Tuesday, May 1, 2012

Week 9 – Final Presentation

After finalizing my design which can be seen in last week’s blog post, I began to draw up the final plans and some perspectives. Because of the diagramming theme, I thought the best materials to use were black fine liner pens which would ensure that any details would be easy to define and understand. My final design did not vary from last week’s entry which made the final drawings a lot easier. Using PowerPoint as the presentation method was very easy and a lot faster to set up than a typical panel. Saying this though, it was difficult to fit the drawing onto the page as well as any text or borders because of the large drawings and smaller page size.
Below are the jpegs of my PowerPoint slides.


 Presentation Feedback: